

The single shank ball terminals that can be swaged successfully with the Type II Swaging Machine are essentially defined by MS20664. The size range, in terms of normal cable diameter, is 1/16″ thru 1/4″.
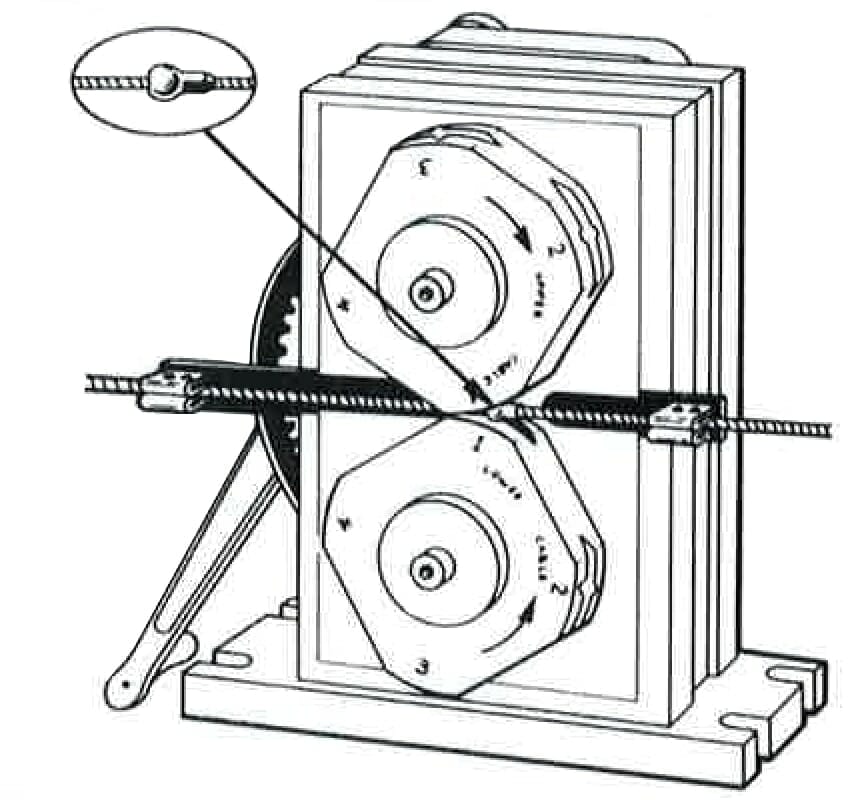
To accommodate the ball in these terminals, the swaging dies are quite different from those used on straight shank terminals. Each roll die has four working arcs separated by four clearance flats. At the midpoint of each working arc is a pocket which receives the ball of the terminal. The four working arcs are numbered 1,2,3, and 4 in the order in which they are to be applied to the terminal, and these numbers are stamped on the flat side of the roll die near the mid point of the appropriate working arc. The normal size of the cable for which the roll die is to be used is also stamped on the flat side of each roll die. The roll dies are finished and supplied as matched pairs to ensure the proper alignment of the opposing grooves when they are mounted on the swaging machine. As shown in Figure 1, one of the pair has the word “UPPER” stamped on its flat side, its mate is marked “LOWER”.
M2 For The Single Or Double Shank Ball Terminal Setup
M2 Roll Swaging Machine Setup for Single or Double Shank Ball Terminals Video Transcript
Welcome back to Loos Tube
Today you’ll learn how to set up a LOCOLOC M2 swaging machine
Unlike the M1 machine which is easily portable, the M2 is meant to be mounted permanently to a bench
Your M2 will arrive in a heavy duty shipping container which doubles as a bench for your machine
Simply remove the machine from the container, mount to the top, and secure with the included bolts
The easy setup process is the same whether you have purchased the manual or power driven model of the M2
At this point you are ready to move on to installing the proper die set
When assembling, refer often to your operator’s manual
The manual contains instructions and diagrams that will assist you through every step of setup and use
You will also find guidance for troubleshooting the machine, instructions for maintenance, and other helpful tips
Begin by identifying whether you are swaging straight shank terminals or ball ends
And select the proper die type
the die sets for straight shank fittings are circular with a groove along the edge that will hold the fitting
Dies for ball type ends are square shaped with grooves in each corner to hold the ball
The corners are labeled one through four to assist in the swaging process
Now choose the proper sized dies for the cable diameter you will be swaging
Each box of dies contains an upper and lower die which are clearly marked
Place the upper and lower dies on to the machine with the markings facing outward
There is a key notch to ensure that the dies will be properly installed
Now, secure the dies with the included flat washer and cap screws but do not overtighten
Simply turn by hand until the fit is snug
This will allow for the dies to move slightly if necessary, and align properly with the fitting while swaging
Your M2 machine comes with a feed guide pre attached
The feed guide has a screw adjusted stop for projects which require many runs of the same cable and fitting combination
If you are swaging fittings onto cable diameters 3/16 of an inch or smaller, you must install the adapter onto the feed guide
Use a 3/16 allen wrench to remove the ¼ inch bolt located at the bottom of the socket
Pass the bolt through the inner hole of the crossbar and screw it into the auxiliary adapter
Once your machine is properly set up, you can prepare the cable and fitting
Thank you for watching Loos Tube
Be sure to subscribe below for updated content and click the links for the next videos in the series
Remove the terminal adapter at the left hand end of the Feed Guide and replace it with the extra spring clip shown in Figure 1. The same flathead screws are used to attach either the adapter or the spring clip to the Feed Guide. Select a matched pair of roll dies marked for the size of cable onto which you wish to swage a ball terminal. The single key in the shafts and keyways in the roll dies will automatically position the two roll dies in the proper index relationship to each other. When the keys and keyways are lined up, push the roll dies all the way onto the shafts and secure them with the special flat washer and socket head bolts. Do not use tools to force the roll dies onto the shafts; this should not be necessary. Rotate the roll dies so that the clearance flats preceding the #1 working arc parallel as shown in Figure 1.
Select a single shank ball terminal of the proper size for the cable onto which is to be swaged. Using the gauge of the proper size range, shown in Figure 2, check the ball and shank of the terminal to be sure it is the correct size. Locate the terminal lengthwise on the cable and mark the cable so that location of the terminal can be checked just before starting the swaging operation. Be sure that the shank is on the correct side of the ball for the intended application. The cable-terminal assembly is now ready to be swaged. Insert the cable-terminal assembly in the Feed Guide with the ball located approximately midway between the spring clips, and the terminal shank on the right hand side of the ball, as shown in Figure 3. If the location of the terminal is at or near the end of the cable and the cable cannot be engaged with both spring clips. It must be engaged with the right-hand spring clip.
M2 For The Single Or Double Shank Ball Terminal Setup
M2 Roll Swaging Machine for Ball Terminals Video Transcript
Welcome back to Loos Tube
Today you’ll learn how to swage ball end fittings with a LOCOLOC M2 swaging machine
This how-to video will demonstrate how to prepare and swage ball end terminals
You should have already setup your M2 machine with the proper set of dies and the feed guide attached
The process is the same whether you are using the manual hand crank or the power drive
For swaging ball shanks you will need a high quality cable cutter, an attribute gauge, and your instruction manual
Cut the cable cleanly and squarely to ensure that it will fit into the bore of the terminal
The fit will be snug, so it is essential that the cable wires don’t spread or broom out
Place the ball at your desired location on the cable
If swaging single shank balls, keep in mind that the shank will face to the right when swaging
So ensure that you have oriented it properly
Slowly turn the lever or depress the foot pedal to rotate the dies to align the arcs labeled one on both the upper and lower dies
This is where you will begin to swage the ball
Snap both ends of the cable onto the feed guide
Place the ball at the beginning of the socket at the number one position
If swaging single shank ends, be sure that the shank is pointed to the right as shown
You may now make your first pass
If your unit is manual, the lever is like a large conventional ratchet wrench
Turn the handle to move the fitting through the dies
If you are using a powered unit simply depress the foot pedal
Next rotate the ball 90 degrees from the first position and align it with the beginning of the arc labeled two
Make a second pass
For the third pass rotate the fitting only 45 degrees
For the fourth pass rotate another 90 degrees and swage
If there is a remaining flash you may rotate 90 degrees once more and pass the ball through the number two position, but this is not necessary
If you are swaging double shank ball ends you will repeat this process exactly the same way for the other side
Check the after swage dimensions of the ball and shank
They should pass easily through the grooves on your attribute gauge
If further reduction is necessary, rotate the fitting again and pass through the number four position a second time
Your ball end terminal is now ready to use
A properly installed LOCOLOC fitting will exceed the break strength of the cable
Thank you for watching Loos Tube
Be sure to subscribe below for updated content and click the links for the next videos in the series
START OF SWAGING BALL TERMINALS
Inch the roll dies until the ball has entered the #1 die pockets, but is not being squeezed as indicated on the cable. Check the location of the terminal on the cable. When you are satisfied that this is correct, rotate the roll dies until the clearance flats between the #1 and #2 working arcs are parallel. To remove the ridge or flash left on the terminal by the first pass, rotate the cable-terminal assembly 90 degrees around its own axis, and move the Feed Guide with the cable to the right. Inch the roll dies around until the ball is accurately engaged in the #2 pocket and then roll it through the #2 working arc. Repeat the same procedure at the #3 and #4 arcs of the roll dies. Rotate the cable-terminal assembly 45 degrees before making the third pass and 90 degrees before making the fourth pass. Rotate 90 degrees and roll through #2 position again to help eliminate remaining flash if desired. Gauge the shank and ball for proper size with the ball terminal gauge. If further reduction is necessary, pass the terminal through the #4 position a second time, rotating the terminal 90 degrees from position used in preceding pass for this final pass. The ball terminal gauge is designed to measure the diameter of the shank and ball between “flash” after swaging.
SWAGING DOUBLE SHANK BALL TERMINALS MS20663
Each end of a double shank ball terminal is swaged as described above, as though it was a single shank terminal. Swage one end of the double shank terminal completely through all four of the roll die working arcs. Then reverse the cable terminal assembly in the Feed Guide and swage the other end in the same manner.