

#3-H Hydraulic Swager Video Transcript
Welcome to Loos and Company’s How-To Video Series demonstrating our LOCOLOC line of handswagers
In this video we’ll be demonstrating the proper use of our # 3-H hydraulic swager swaging tool
This tool is capable of swaging ¼ through half-inch aluminum and copper oval sleeves
Each of our tools comes with a durable carrying case
Which includes a complete set of instructions to guide you in the proper operation of your tool
As well as a go gauge for checking the finished after swage dimension of your fittings
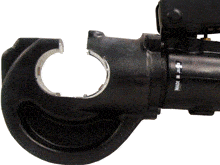
In preparing your tool for use you will need to assemble the desired size die set into the tool head
To do this, push the die release button on the side of the lower jaw and place one die of the set into the lower jaw
Center it and release the button
If it difficult to depress the die pin, pump the handle several times
This will expose the pin and make it readily accessible
To install the die in the upper part of the jaw, press the die release button on the head as shown and insert the die into the jaw
Center it and release the pin
Note the warning label on each of our tools
You will want to make sure you are not using the tool around electrical wires or in an electrical panel and always wear safety glasses
Loos and Company highly recommends the use of our FELCO cable cutters
These cutters are made in Switzerland and are by far the best cable cutters on the market
The V-shaped construction of the blades are designed to compress the individual strands of the cable as you make the cut
So that it gives you a clean cut every time
This allows the operator to quickly put on the desired fitting without any frayed or loose wires
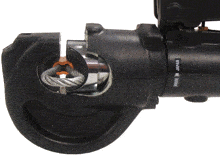
For this demonstration we will be making a loop
Notice how the oval sleeve easily passes over the cable and can easily be formed into a loop
It is important to note that whenever attaching a fitting of this type that you leave a tail at least one cable diameter protruding from the fitting
This ensures that the cable is compressed over the entire length of the fitting
In this demonstration we will be compressing a 5/16 copper oval sleeve
Starting at the end of the fitting furthest from the loop, begin to make your first compression
Pumping the handle approximately 25 to 30 times until a clicking sound is heard
This sound indicates that the first stage has been bypassed
Continue pumping an additional five to seven more times until the second stage bypass clicking sound is heard
This will indicate the swage is complete
Release the pressure by twisting the pump handle clockwise, while holding the handle in the open position then moving the handle down into the closed position
After the first compression, we recommend you used the supplied go gauge to check the finished after swage dimension using the corresponding cavity in the gauge
The gauge should pass easily over the swaged area
Since this is a 5/16th cable, the enclosed instructions dictate that two compressions need to be made to complete this attachment
Continue by making the next compression as described previously
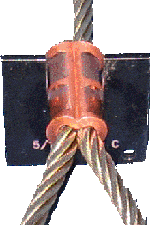
Space the swage evenly over the length of the fitting, working your way towards the loop
Upon completion, check both compressions with the go gauge
This properly swaged fitting will generate full breaking strength on the cable
Note that there is no adjustment on our #3 hydraulic swager
Should your tool ever fail to make a swage that will not pass the go gauge, you will need to return it to Loos and Company for calibration
This concludes our video demonstration, thank you for watching
#3-H Hydraulic Swager
Cable splicing is much easier if the cable is cut clean without frayed ends. We highly recommend C7, C9, C12 or C16 cable cutters.
SWAGER OPERATION INSTRUCTIONS
TO INSERT A DIE IN THE TOP OF THE HEAD. Push the die release button and place one die of the set in the top of the head, center it and release the button. INSERT THE OTHER DIE IN THE BOTTOM OF THE HEAD. Depress the die release pin and place the other die of the set in the bottom of the head and release the pin. The die will be held by the retainer pin. If it is difficult to depress the die release pin, pump the handle several times, this will expose the pin.
THE HEAD OF THE COMPRESSOR WILL ROTATE 180 DEGREES. The head can be rotated to any desired position to accommodate operator’s view of the dies, fitting position and operation. CAUTION Do not rotate the head under hydraulic pressure

OPERATE THE PUMP HANDLE until the dies are closed. If the dies are not clearly visible, the pumping should continue until a sound from bypass valve is heard. First Stage, the pumping sound will accompany a reduction in the force required to close the pump handle. After first stage has bypassed, pump 5 to 6 more times until it hits the second stage bypass. If the dies fail to close, it will be due to:
- the tool being used for some application for which it was not designed.
- the pressure not building up to 700kgs/cm (10,000 psi)
- the wrong dies being used for the incorrect size sleeve.

Properly Swaged Sleeve RELEASE PRESSURE AFTER OPERATION. Release pressure by twisting pump handle clockwise while holding the handle in the open position, then move the handle into the closed position. WARNING: Keep fingers clear from the dies and ram during operation.
Use the gauge that is provided to check the accuracy.
REFILL OIL
- Place the tool, head downward, and hold it in a vertical position.
- Release pressure by twisting the handle clockwise and press down.
- Remove the body handle assembly.
- Pump the handle several times and release pressure. Repeat this procedure several times. This will clear any air bubbles in the hydraulic system.
- Holding the pump handle in the closed position, remove the reservoir cap with care as air bubbles may remain in the end of the oil reservoir.
- Fill oil (Shell Tellus oil T15, Mobile DET-13, or equal) and reset the cap.
- Check the oil reservoir for pin holes by squeezing reservoir with fingers. If any leaks are detected, replace with a new reservoir.
PREVENTIVE MAINTENANCE
- Do not pump the tool to closed jaw position when the dies are not placed in the head. This can place excessive pressure on the jaws resulting in fracture or distortion of the jaws. If the jaws are mistakenly closed without the dies, do not continue to apply pressure by further pumping. If jaws are closed without die, loosen the bypass and the release valve.
- Keep the tool clean and free from dirt or metal particles, especially around the head, dies and ram of the tool.
- Check the oil level periodically and use clean oil as recommended. Never mix different brands or types of oil as deterioration of the oil seals may result.
- Do not adjust bypass cartridge.
| Cable Diameter | Part # | Die & Guage # | Sleeve | # of Compressions | After Swage Diameter |
|---|---|---|---|---|---|
| 1/4" | HD3-8 | 1/4" | Copper & Aluminum Oval | 2 | 0.610 |
| 5/16" | HD3-10 | 5/16" | Copper & Aluminum Oval | 2 | 0.735 |
| 3/8" | HD3-12 | 3/8" | Copper & Aluminum Oval | 3 | 0.815 |
| 7/16" | HD3-14C | 7/16" | Copper Oval | 4 | 0.915 |
| 7/16" | HD3-14A/16C | 7/16" | Aluminum Oval | 3 | 1.025 |
| 1/2" | HD3-14A/16C | 1/2" | Copper Oval | 4 | 1.100 |
| 1/2" | HD3-16A | 1/2" | Aluminum Oval | 4 | 1.200 |