

#1-SC Hand Swager Video Transcript
Welcome to Loos and Company’s How-To video series, demonstrating our LOCOLOC line of handswagers
In this video we will be demonstrating the proper use of our #1-SC Hand Swager swaging tool
This is a five cavity tool, capable of swaging 1/16 through 3/16 aluminum and copper oval and stop sleeves and is proudly made here in the USA
Each of our tools come individually boxed and labelled with our part number and lot number
And come with a complete set of instructions to guide you in the proper operation of our handswagers
As well as a parts list should your tool ever need to be repaired
This tool also comes with a go gauge for checking the finish after swage dimension of your fitting
A packet of grease is also included to keep your tool operating smoothly over the course of time
Notice the snap over center action when the tool is put into the closed position
This ensures that each compression of the tool is complete
Notice the warning label on each of our tools
You will want to make sure you are not using around the tool around electrical wires or an electrical panel and always use safety goggles and protective gear
The jaws of the tool are clearly marked to identify the size of the cable that is to be used with each cavity
Loos and Company highly recommends the use of our FELCO cable cutters
These cutters are made in Switzerland and are by far the best cable cutters on the market
The V-shaped construction of the blades are designed to compress the individual strands of the cable as you make the cut, so that it gives you a clean angle cut every time
This allows the operator to quickly put on a desired fitting without any frayed or loosed wires
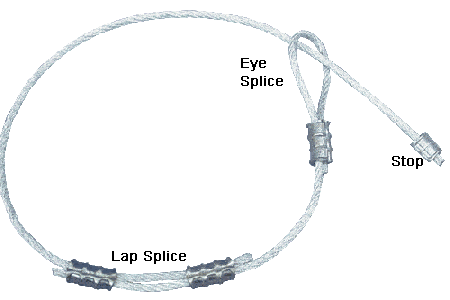
For this demonstration we will be making a loop
You will notice that the cable easily passes through the oval sleeve and can easily be formed into a loop
It is important to note that whenever attaching a fitting of this type, that you leave a tail at least one cable diameter protruding from the fitting
This ensures that the cable is compressed over the entire length of the fitting
For this demonstration we will be compressing a 3/16 oval sleeve which requires the largest rear cavity of the tool
Starting at the end of the fitting furthest from the loop, begin to make your first compression
After the first compression we recommend that you use the supplied go gauge to check the finished after swage dimension using the corresponding cavity in the gauge
The gauge should pass easily over the swaged area
Since this is a 3/16 diameter cable, the instructions dictate that four compressions need to be made to complete this attachment
Continue by making the next three compressions over the length of the fitting, working your way towards the loop
After each compression, rotate the loop 180 degrees to keep the sleeve from bending
The compression should be spaced evenly over the entire length of the fitting
Upon completion, check each compression with the go gauge
This properly swaged fitting will generate full breaking strength on the cable
All of our LOCLOLOC tools are fully adjustable
If your LOCOLOC handswager should ever fail to make a swage that will not pass the go gauge, you can adjust the handswager using an allen wrench
By making ¼ increment turns until your tool produces a swage that will pass the go gauge
This concludes our video demonstration, thank you for watching
#1-SC MULTI-GROOVE HANDSWAGING TOOL FOR 1/16”, 3/32″, 1/8″, 5/32, & 3/16″
Cable splicing is much easier if the cable is cut clean without frayed ends. We highly recommend C7, C9, C12 or C16 cable cutters as shown in the Loos & Co. Cableware Division catalog. LOCOLOC® Oval and Stop sleeves in a complete range of sizes are available.
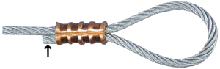
Sleeves elongate after compression. To assure maximum holding allow the end of the cable to extend beyond the sleeve after it is compressed (see illustration below). Keep the jaws of the swager at right angles to the sleeve being compressed, making sure the sleeve is aligned in the jaw grooves. Then close the handles of the swager completely. (Note: for lap splices, at least two oval sleeves should be used.)
Each Loos & Co. LOCOLOC® Swager is designed to work with one or more specific size sleeves. FOR USE ON ALL METAL CONSTRUCTION CABLES, 7×7, 7×19, 6×19 IWRC ON SIZES UP TO 3/16. You will not obtain performance if you do not use the proper swager and sleeve combination. The chart below shows the specific size sleeve to be used with a particular swager number. All compressions must be gauged to assure maximum holding strength, and it is recommended that all assemblies should be proof-tested.
SWAGER OPERATION INSTRUCTIONS

Place sleeve to be compressed in proper size groove in swaging tool. Single cavity tools should match cable size to be swaged. Length of cable equal to the cable diameter should extend beyond length of sleeve to achieve maximum holding. (See arrow in figure 3)

Keep jaws of swaging tool at right angles to the sleeve to be compressed, making sure the sleeve is aligned in the jaw grooves. Close tool completely. Tool handles should snap shut, indicating complete closure.
Finished sleeve should look like this. Be sure sleeves have been compressed the proper number of times. (See NUMBER OF COMPRESSIONS table below)
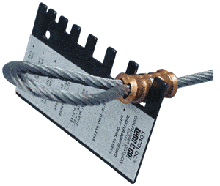
Use Swaging gauge provided with the tool to check proper after swage diameter. Compressed sleeve should slide freely into size slot of gauge.
SWAGER OPERATION INSTRUCTIONS
Your Loos & Co. LOCOLOC® Swager has been designed to give you years of trouble free service. To obtain the best possible performance, we recommend: (1) clean and lubricate all moving parts regularly; (2) keep all bolts tight; (3) keep your swager properly adjusted using the following simple procedure:
Each LOCOLOC® Swager is supplied with a gauge. Select the slot in the gauge corresponding to the sleeve size being compressed. The compressed portion of the sleeve should pass into the gauge easily. If it does not, then adjust your swager as follows:
With the handles apart, use a 3/16″ Allen wrench to tighten set screw in handle 1/4 turn. Then compress sleeve and check with the gauge. Continue this procedure until the compressed portion of the sleeve passes easily into the gauge. These instructions apply to all #1-SC, #0, #0-SC, and #1-BSC Loos & Co. LOCOLOC® Swagers
“CAUTION” OVER-ADJUSTMENT WILL CAUSE THE ADJUSTMENT BOLT TO BREAK!
| NUMBER OF COMPRESSIONS | ||
|---|---|---|
| Cable Diameter | Aluminum & Copper | |
| Oval Sleeves | Stop Sleeves | |
| 1/16" | 2 | 1 |
| 3/32" | 2 | 2 |
| 1/8" | 3 | 2 |
| 5/32" | 3 | 2 |
| 3/16" | 4 | 2 |
| If you are swaging only one size sleeve, select the proper tool number from this chart. | |||||
|---|---|---|---|---|---|
| SWAGER FOR ALUMINUM OR COPPER OVAL SLEEVES | SWAGER FOR ALUMINUM OR COPPER STOP SLEEVES | SWAGER FOR STAINLESS STEEL OVAL SLEEVES | |||
| CABLE DIA. | USE TOOL NO. | CABLE DIA. | USE TOOL NO. | CABLE DIA. | USE TOOL NO. |
| 3/64" | 0-3/64 | 3/64" | 0-3/64 | 3/64" | 0-3/64 |
| 1/16" | 0-1/16 | 1/16" | 0-1/16 | 1/16" | 0-3/64 |
| 3/32" | 0-3/32 | 3/32" | 0-3/32 | 3/32" | 0-1/16 |
| 1/8" | 0-1/8 | 1/8" | 0-1/8 | 1/8" | 0-3/32 |
| 5/32" | 0-5/32 | 5/32" | 0-1/8 | 5/32" | 0-1/8 |
| 3/16" | 0-3/16 | 3/16" | 0-1/8 | 3/16" | 0-5/32 |
| 7/32" | 0-7/32 | 7/32" | 0-1/8 | 7/32" | 0-3/16 |
| 1/4" | 0-1/4 | 1/4" | 0-1/4 | 1/4" | 0-7/32 |
| 9/32" | 0-9/32 | 9/32" | 0-1/4 | ||
| 5/16" | 0-5/16 | 5/16" | 0-1/4 | ||
| 3/8" | 0-1/4 | ||||
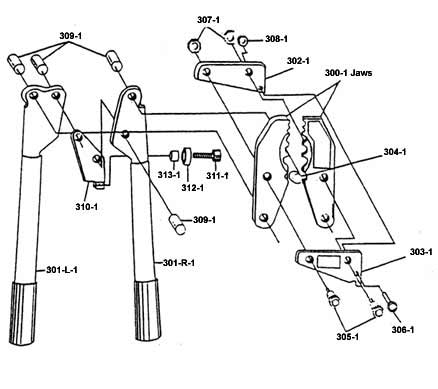
| Part# | Description | Qty. |
|---|---|---|
| 301-L-1 | Handle, left | 1 |
| 309-1 | Connecting Pin | 3 |
| 300-1A | Swaging Jaw Head Assy. | 1 |
| SOLD AS ASSEMBLY ONLY, INCLUDES: | ||
| 300-1 jaws | Swaging Jaw Set | 1 |
| 302-1 | Back Plate | 1 |
| 303-1 | Front Plate | 1 |
| 304-1 | Fulcrum Pin | 1 |
| 305-1 | Jaw Bolt | 1 |
| 306-1 | Plate Bolt | 1 |
| 307-1 | Nut for Jaw Bolt | 2 |
| 308-1 | Nut for Plate Bolt | 1 |
| 301-R-1A | Handle Assembly, right | 1 |
| SOLD AS ASSEMBLY ONLY, INCLUDES: | ||
| 301-R-1 | Handle | 1 |
| 309-1 | Connecting Pin | 1 |
| 310-1 | Adjusting Arm | 1 |
| 311-1 | Adjusting Screw | 1 |
| 312-1 | Washer | 1 |
| 313-1 | Nylon Bushing | 1 |