The single shank ball terminals that can be swaged successfully with the Type II Swaging Machine are essentially defined by MS20664. The size range, in terms of normal cable diameter, is 1/16″ thru 1/4″.
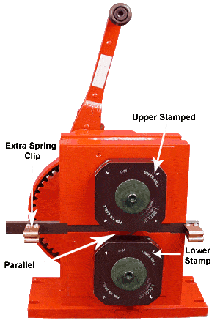
To accommodate the ball in these terminals, the swaging dies are quite different from those used on straight shank terminals. Each roll die has four working arcs separated by four clearance flats. At the midpoint of each working arc is a pocket which receives the ball of the terminal. The four working arcs are numbered 1,2,3, and 4 in the order in which they are to be applied to the terminal, and these numbers are stamped on the flat side of the roll die near the mid point of the appropriate working arc. The normal size of the cable for which the roll die is to be used is also stamped on the flat side of each roll die. The roll dies are finished and supplied as matched pairs to ensure the proper alignment of the opposing grooves when they are mounted on the swaging machine. As shown in Figure 1, one of the pair has the word “UPPER” stamped on its flat side, its mate is marked “LOWER”.
M2 For The Single Or Double Shank Ball Terminal Setup
M2 Roll Swaging Machine Setup for Single or Double Shank Ball Terminals Video Transcript
欢迎回到卢斯管
今天,您将学习如何设置 LOCOLOC M2 预装机
与便于携带的 M1 机器不同,M2 需要永久安装在工作台上。
您的 M2 将装在一个重型货运集装箱内,该集装箱可作为机器的工作台
只需将机器从容器中取出,安装到顶部,并用随附的螺栓固定即可。
无论您购买的是 M2 的手动型还是电动型,设置过程都是一样的。
至此,您已准备好安装合适的模具组
装配时,请经常参阅操作手册
手册中的说明和图解将帮助您完成设置和使用的每一个步骤
您还可以找到机器故障排除指南、维护说明和其他有用的提示
首先要确定是要装直柄端子还是球头端子
并选择适当的模具类型
用于直柄管接头的模具套件是圆形的,边缘有一个凹槽,可以固定管接头
用于球形端头的模具为方形,每个角上都有凹槽,用于固定钢球
角上标有一至四号标签,以帮助安装过程
现在,请根据您要卷绕的电缆直径选择适当尺寸的模具
每个模具盒都包含一个上模和一个下模,上模和下模都有清晰的标记
将上下模具放在机器上,标记朝外
有一个关键凹槽可确保模具正确安装
现在,用附带的平垫圈和盖形螺钉固定模具,但不要拧得太紧。
只需用手旋转,直到完全吻合即可
这将允许模具在必要时轻微移动,并在压接时与接头正确对齐
M2 机器预装了进给导轨
进给导向装置有一个螺纹调节挡块,适用于需要多次使用相同电缆和接头组合的项目
如果要将接头装到直径为 3/16 英寸或更小的电缆上,则必须将适配器安装到进给导轨上。
使用 3/16 通用扳手卸下插座底部的 1/4 英寸螺栓
将螺栓穿过横梁内孔,拧入辅助适配器
机器设置妥当后,就可以准备电缆和接头了
感谢您收看 Loos Tube
请务必在下方订阅最新内容,并点击链接查看该系列的下一个视频

Remove the terminal adapter at the left hand end of the Feed Guide and replace it with the extra spring clip shown in 图一. The same flathead screws are used to attach either the adapter or the spring clip to the Feed Guide. Select a matched pair of roll dies marked for the size of cable onto which you wish to swage a ball terminal. The single key in the shafts and keyways in the roll dies will automatically position the two roll dies in the proper index relationship to each other. When the keys and keyways are lined up, push the roll dies all the way onto the shafts and secure them with the special flat washer and socket head bolts. Do not use tools to force the roll dies onto the shafts; this should not be necessary. Rotate the roll dies so that the clearance flats preceding the #1 working arc parallel as shown in 图一.

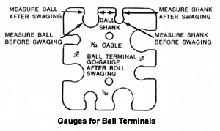
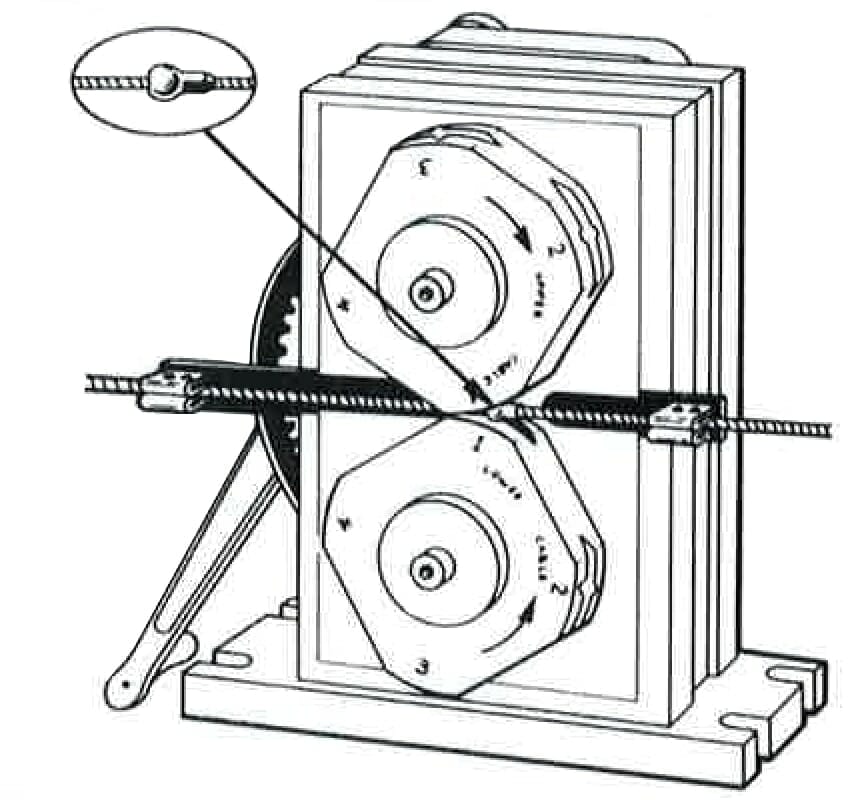
Select a single shank ball terminal of the proper size for the cable onto which is to be swaged. Using the gauge of the proper size range, shown in 图 2, check the ball and shank of the terminal to be sure it is the correct size. Locate the terminal lengthwise on the cable and mark the cable so that location of the terminal can be checked just before starting the swaging operation. Be sure that the shank is on the correct side of the ball for the intended application. The cable-terminal assembly is now ready to be swaged. Insert the cable-terminal assembly in the Feed Guide with the ball located approximately midway between the spring clips, and the terminal shank on the right hand side of the ball, as shown in 图 3. If the location of the terminal is at or near the end of the cable and the cable cannot be engaged with both spring clips. It must be engaged with the right-hand spring clip.
M2 For The Single Or Double Shank Ball Terminal Setup
M2 Roll Swaging Machine for Ball Terminals Video Transcript
欢迎回到卢斯管
Today you’ll learn how to swage ball end fittings with a LOCOLOC M2 swaging machine
This how-to video will demonstrate how to prepare and swage ball end terminals
您应该已经在 M2 机器上安装了适当的模具和进料导向装置。
无论是使用手动手摇曲柄还是动力驱动,过程都是一样的
For swaging ball shanks you will need a high quality cable cutter, an attribute gauge, and your instruction manual
干净利落地剪断电缆,确保电缆能插入接线端子的孔中。
安装将非常紧凑,因此必须确保电缆线不会散开或扫出
Place the ball at your desired location on the cable
If swaging single shank balls, keep in mind that the shank will face to the right when swaging
So ensure that you have oriented it properly
Slowly turn the lever or depress the foot pedal to rotate the dies to align the arcs labeled one on both the upper and lower dies
This is where you will begin to swage the ball
Snap both ends of the cable onto the feed guide
Place the ball at the beginning of the socket at the number one position
If swaging single shank ends, be sure that the shank is pointed to the right as shown
You may now make your first pass
If your unit is manual, the lever is like a large conventional ratchet wrench
转动手柄使接头穿过模具
If you are using a powered unit simply depress the foot pedal
Next rotate the ball 90 degrees from the first position and align it with the beginning of the arc labeled two
Make a second pass
For the third pass rotate the fitting only 45 degrees
For the fourth pass rotate another 90 degrees and swage
If there is a remaining flash you may rotate 90 degrees once more and pass the ball through the number two position, but this is not necessary
If you are swaging double shank ball ends you will repeat this process exactly the same way for the other side
Check the after swage dimensions of the ball and shank
They should pass easily through the grooves on your attribute gauge
If further reduction is necessary, rotate the fitting again and pass through the number four position a second time
Your ball end terminal is now ready to use
A properly installed LOCOLOC fitting will exceed the break strength of the cable
感谢您收看 Loos Tube
请务必在下方订阅最新内容,并点击链接查看该系列的下一个视频
START OF SWAGING BALL TERMINALS

Inch the roll dies until the ball has entered the #1 die pockets, but is not being squeezed as indicated on the cable. Check the location of the terminal on the cable. When you are satisfied that this is correct, rotate the roll dies until the clearance flats between the #1 and #2 working arcs are parallel. To remove the ridge or flash left on the terminal by the first pass, rotate the cable-terminal assembly 90 degrees around its own axis, and move the Feed Guide with the cable to the right. Inch the roll dies around until the ball is accurately engaged in the #2 pocket and then roll it through the #2 working arc. Repeat the same procedure at the #3 and #4 arcs of the roll dies. Rotate the cable-terminal assembly 45 degrees before making the third pass and 90 degrees before making the fourth pass. Rotate 90 degrees and roll through #2 position again to help eliminate remaining flash if desired. Gauge the shank and ball for proper size with the ball terminal gauge. If further reduction is necessary, pass the terminal through the #4 position a second time, rotating the terminal 90 degrees from position used in preceding pass for this final pass. The ball terminal gauge is designed to measure the diameter of the shank and ball between “flash” after swaging.
SWAGING DOUBLE SHANK BALL TERMINALS MS20663
Each end of a double shank ball terminal is swaged as described above, as though it was a single shank terminal. Swage one end of the double shank terminal completely through all four of the roll die working arcs. Then reverse the cable terminal assembly in the Feed Guide and swage the other end in the same manner.


