M1 Roll Swaging Machine for Ball Terminals Video Transcript
Bienvenue à Loos Tube
Aujourd'hui, vous allez apprendre à utiliser notre machine à rétreindre M1 LOCOLOC
This how-to video will demonstrate how to prepare and swage ball shank terminals
You should have already set up your LOCOLOC M1 swaging machine with the proper set of dies and the feed guide attached with the adapter removed
For swaging ball ends you will need a high quality cable cutter, an attribute gauge, and your included instruction manual
Une fois que votre M1 est prêt à être serti, préparez le câble et le raccord.
Commencez par couper le câble proprement et d'équerre afin de vous assurer qu'il s'insère dans l'alésage de la borne.
L'ajustement sera serré et il est donc essentiel que les fils du câble ne s'écartent pas ou ne sortent pas.
Placez la balle à l'endroit souhaité sur le câble.
If swaging single shank balls, keep in mind the shank will face to the right when swaging, so ensure you have oriented it properly
Insérer l'extrémité du raccord dans l'adaptateur du guide d'alimentation et enclencher le câble.
Grasp the pins on the lower die and turn counterclockwise to align the arcs labeled one on both the upper and lower dies
C'est ici que vous commencerez à sertir la boule.
Place the tip of the ball at the beginning of the socket at the number one position
If swaging single shank ends be sure that the shank is pointed to the right as shown
Vous pouvez maintenant faire votre première passe
Pump the handles slowly, paying attention that the fitting is properly aligned
Next, rotate the ball 90 degrees from the first position and align it with the beginning of the arc labelled two
Make the second pass
For the third pass, rotate the fitting only 45 degrees
For the fourth pass, rotate another 90 degrees and swage
If there is a remaining flash you may rotate 90 degrees once more and pass the ball through the number two position again, but it is not necessary
If you are swaging double shank ball ends you will repeat this process exactly the same way but in the other direction
Votre terminal à bille est maintenant prêt à l'emploi
Check the after swage dimensions of the ball and the shank
This should pass easily through the grooves on the attribute gauge
If further reduction is necessary, rotate the swaged fitting 90 degrees again and pass it through the number four position a second time
Un raccord LOCOLOC correctement installé dépassera la résistance à la rupture du câble.
Merci de regarder Loos Tube
Be sure to subscribe below for updated content and with any questions visit our website or contact our customer service department
M1 For The Single Or Double Shank Ball Terminal
The Rolls for swaging shank type ball terminals have the cable sizes for which they are designed stamped into their front faces, along with the designations “UPPER” and “LOWER”. Unlike the rolls for straight shank terminals, these rolls each have four active arcs separated by four clearance flats. The active arcs are numbered, 1,2,3,4, and these numbers are stamped into the front faces of the rolls at the midpoint of the respective arcs. At the midpoint of the groove in each active arc is a pocket sized to match the ball of the terminal being swaged. Like the lower rolls for straight shank terminals, these lower rolls are fitted with two pins protruding from their faces to enable the operation to turn the rolls by hand.
MISE EN PLACE DE LA MACHINE

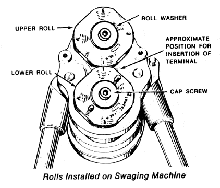
Select the pair of rolls marked with the size of the cable to which you wish to attach the terminal. Install the roll marked “UPPER” on the top shaft of the machine so that the word “UPPER” stamped on the flat side of the roll is visible. Install the other roll of the matched pair marked “LOWER” on the lower shaft of the machine so that the word “LOWER” stamped on the flat side of the roll is visible and the two pins protruding from that face are on the outside. When the keys in the roll shafts engage the keyways in the rolls, the rolls are properly indexed with respect to one another. Push the rolls all the way onto the shafts by hand. Do not use tools to force the rolls onto the shaft; this should not be necessary. Secure the rolls by means of the washer and cap screws as shown in Figure 1.

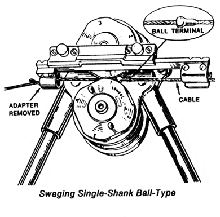
Attach the feed guide assembly to the machine with the two knurled finger screws as shown in Figure 2. The feed adapter has no function in connection with the ball type terminals and should be removed. The machine is now ready to receive and swage the cable terminal assembly.

PREPARING THE CABLE AND TERMINAL
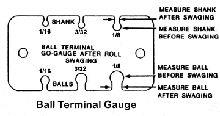
Select a shank type ball terminal to fit the size of cable being used; refer to Military Specification Sheet. Gauge the terminal carefully to make certain that it is not oversize. The terminal shank should fit into the circular opening on the side of the gauge which is marked “SHANK”, as shown in Figure 3. The ball should fit into the circular opening at the side of the gauge marked “BALLS”. Locate the ball of the terminal lengthwise on the cable as required for the particular application and mark this location so that it can be checked when the cable and terminal are in the machine ready for swaging.
SWAGING SINGLE SHANK BALL TERMINAL
With the single shank-type ball terminal correctly located on the cable, use the two pins on the lower roll to rotate the rolls until the ball has just started to enter the socket at the No.1 position on the rolls. Be sure that the terminal is properly positioned with the shank sleeve pointing toward the right, as shown in Figure 2.
Roll the ball through the No. 1 position on the rolls slowly to compress the terminal on the cable. Make certain that the ball enters the socket accurately in order to prevent distortion of the ball.
To remove the ridge left by the first pass, rotate the terminal 90 degrees from the first position and reposition the rolls so that the terminal ball is just ready to enter the ball socket No. 2. Roll through the No. 2 position.
Repeat the same procedure at the No. 3 and No. 4 position on the rolls. Rotate the cable and terminal 45 degrees before making the third pass and 90 degrees before making the fourth pass.
Rotate 90 degrees and roll through No. 2 position again to help eliminate remaining flash, if desired.
Gauge the shank and ball for proper size with the ball terminal gauge. If further reduction is necessary, pass the terminal through the No. 4 position a second time and rotate the terminal 90 degrees from position used in preceding pass for this final pass. The ball terminal gauge is designed to measure the diameter of the shank and ball between “flash” after swaging.
BORNES À BILLES À DOUBLE TIGE À SERTIR MS20663
Each end of a double shank-type ball terminal is swaged in the same manner as the single shank terminal. Swage the right hand end of the terminal completely through all four positions. Then reverse the cable terminal assembly in the feed guide and swage the other end in the same manner.


