

M2 For The Straight Shank Terminal Setup
M2 Roll Swaging Machine Setup Video Transcript
Welcome back to Loos Tube
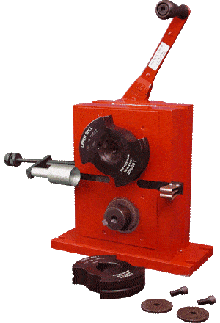
Today you’ll learn how to set up a LOCOLOC M2 swaging machine
Unlike the M1 machine which is easily portable, the M2 is meant to be mounted permanently to a bench
Your M2 will arrive in a heavy duty shipping container which doubles as a bench for your machine
Simply remove the machine from the container, mount to the top, and secure with the included bolts
The easy setup process is the same whether you have purchased the manual or power driven model of the M2
At this point you are ready to move on to installing the proper die set
When assembling, refer often to your operator’s manual
The manual contains instructions and diagrams that will assist you through every step of setup and use
You will also find guidance for troubleshooting the machine, instructions for maintenance, and other helpful tips
Begin by identifying whether you are swaging straight shank terminals or ball ends
And select the proper die type
the die sets for straight shank fittings are circular with a groove along the edge that will hold the fitting
Dies for ball type ends are square shaped with grooves in each corner to hold the ball
The corners are labeled one through four to assist in the swaging process
Now choose the proper sized dies for the cable diameter you will be swaging
Each box of dies contains an upper and lower die which are clearly marked
Place the upper and lower dies on to the machine with the markings facing outward
There is a key notch to ensure that the dies will be properly installed
Now, secure the dies with the included flat washer and cap screws but do not overtighten
Simply turn by hand until the fit is snug
This will allow for the dies to move slightly if necessary, and align properly with the fitting while swaging
Your M2 machine comes with a feed guide pre attached
The feed guide has a screw adjusted stop for projects which require many runs of the same cable and fitting combination
If you are swaging fittings onto cable diameters 3/16 of an inch or smaller, you must install the adapter onto the feed guide
Use a 3/16 allen wrench to remove the ¼ inch bolt located at the bottom of the socket
Pass the bolt through the inner hole of the crossbar and screw it into the auxiliary adapter
Once your machine is properly set up, you can prepare the cable and fitting
Thank you for watching Loos Tube
Be sure to subscribe below for updated content and click the links for the next videos in the series
All roll dies have stamped on their flat sides the normal size of the cable with which they are designed to be used.
Select the matched pair of roll dies marked with the normal size of the cable on which you wish to swage a straight shank terminal. Install the roll dies on the shaft of the machine so that the word “UPPER” stamped on the flat side of the roll die on the upper shaft, and the word “LOWER” stamped on the flat side of the roll die on the lower shaft are visible as shown below. This is necessary in order to be sure that the grooves in the working faces of the two roll dies are properly lined up with one another.
The single key in the shafts and keyways in the roll dies will automatically position the two roll dies in the proper index relationship to each other. When the keys and keyways are lined up, push the roll dies all the way onto the shafts and secure them with the special flat washer and socket head bolts shown in Figure 1. Do not use tools to force the roll dies onto the shafts. This should not be necessary.
FEED GUIDE
The function of this component of the Type II Swaging Machine is to hold the cable and terminal in the proper position relative to the roll dies at the start of the swaging operation. It guides the movement of the cable toward the roll dies during the operation. It is a steel bar that slides in a slot in the roll side frame of the machine. It carries a spring clip that engages the cable, a socket engages the head of the terminal, and a screw-adjusted stop. This stop is used when the operator wishes to swage a run of several identical cable and terminal combinations. It enables the customer to set the feed guide carrying the cable and terminal at the same location relative to the roll dies each time the operator starts a new swaging operation. The adjustable stop is simply a 3/8 x 16 screw threaded into the crossbar. A knurled capstan nut is welded to the outboard end of the screw to serve as a convenient handle. A second knurled capstan nut is threaded onto the screw and bears on the crossbar to lock the screw in position. The inboard end on the screw strikes on the machine frame to stop the motion of the feed guide at the point of the swaging operation.

The feed guide assembly is shown, installed in the machine in Figure 2. To Remove feed assembly from the machine, detach the spring clip from the right hand end of the bar and slip the bar to the left until it comes out of the slot in the machine frame. (The spring clip is detached by removing the two Allen head screws on the back of the bar.) The socket at the left hand end of the bar is designed to accept terminal heads for cables larger than 3/16″ diameter. With terminal heads for cable 3/16″ and smaller, the auxiliary adapter (Figure 2) must be used. To install the adapter, use an Allen wrench to back out the 1/4″ bolt located at the bottom of the socket. (This bolt holds the adjustable stop crossbar and cylindrical spacer to the socket.) [Note: The outer hole in the crossbar is tapped 1/4″x 20, while the inner hole is drilled 1/4″ and is not threaded.] Pass the 1/4″ x 28 hex head bolt through the inner hole of the crossbar, the cylindrical spacer, and the bottom of the original feed guide socket and screw it into the auxiliary adapter.
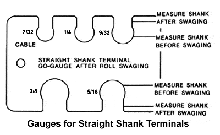
It is essential that the cable and the terminal you select to swage onto it are both the same size. Check the cable diameter with a micrometer and, using the gauge (included in the kit Figure 3) check the outside diameter of the terminal shank to be sure it corresponds to the size of the cable. Complete dimensional data on cable and terminals that can be assembled successfully by the LOCOLOC®-Kearney Type II Swaging Machine are specified in the operator’s manual.
M2 For The Straight Shank Terminal Use
M2 Roll Swaging Machine for Straight Shank Terminals Video Transcript
Welcome back to Loos Tube
Today you’ll learn how to swage straight shank fittings with a LOCOLOC M2 swaging machine
This how-to video will demonstrate how to prepare and swage straight shank terminals
You should have already setup your M2 machine with the proper set of dies and the feed guide attached
The process is the same whether you are using the manual hand crank or the power drive
For swaging straight shanks you will need a high quality cable cutter, a permanent market, an attribute gauge, and your instruction manual
Being by preparing the fitting
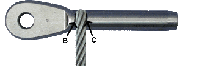
Cut the cable cleanly and squarely to ensure that it will fit into the bore of the terminal
The fit will be snug, so it is essential that the cable wires don’t spread or broom out
Start by inserting the cable fully into the terminal and mark on the cable where it first appears at the end
This is referred to as point A in the manual
Place the cable beside the terminal aligning point A with the tip
Now mark on the fitting where the cable ends, this is point B
Now place the cable next to point B perpendicular to the fitting
And make another mark that is equal to the diameter of the cable
This is point C
Point C is important to find and remember because it is the point you will align with the dies to begin your swage
Press the cable partly back into the bore and bend sharply
This will ensure that the fitting will remain in place on the cable while being inserted into the machine
Now ensure that the upper and lower dies are centered
There should be a clear opening to lay your fitting and cable into
Insert the end of the fitting into the feed guide adapter and snap the cable into place
Be sure you can see your point C marking from earlier
If you begin the swage at any point above point C you risk significant damage to your machine that may result in costly repairs
Inch the role dies into place aligning the points of the dies on point C
You may adjust your stopping screw at this point if you are completing many assemblies with the same cable and fitting
You can now begin the swage
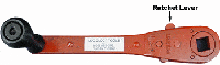
If your unit is manual the lever is like a large conventional rachet wrench
Turn the handle to move the fitting through the dies
If you are using a powered unit, simply depress the foot pedal
Now rotate the terminal within the feed guide 90 degrees from its original position and repeat this process
Rotate the terminal again
This time 45 degrees
Then turn the dies to meet at point C and make one final pass
Test the diameter of the shank opposite from the last pass with a Loos attribute gauge to ensure that a proper swage was achieved
If it does not pass through the appropriate slot on the gauge, rotate 45 degrees from the last position and swage again
Never use more than four passes as it may cause work hardening
If it passes through the slot on your gauge, your swage fitting will maintain the break strength of the cable
Thank you for watching Loos Tube
Be sure to subscribe below for updated content and click the links for the next videos in the series

Push the cable into the fitting until the end of the cable reaches the bottom of the bore. Mark the cable at point (A) as shown in Figure 4.

Place the cable beside the fitting shank and have mark (A) placed flush with the bottom of the shank. Mark the shank at point (B) using the end of the cable as shown in Figure 5.
Place the cable next to the mark (B) and mark the shank at point (C) as shown in Figure 6. (one cable diameter)

Push the cable back into the fitting until mark (A) is flush with the bottom of the shank again. Start your swaging at mark (C) on the shank as shown in Figure 7 .
Insert the cable to approximately half the depth of the bore and holding the cable close to the end of the terminal, bend it sharply enough to set a bend into the cable as shown in Figure 7 . This is to help ensure that the terminal will not move on the cable while they are being inserted in the swaging machine. On Fork Shank Terminals sizes 1/16 to 5/16, push the cable into the terminal until the end of the cable reaches the end of the bore. Pull the cable back 1/8″ to 1/4″short of the end of the bore. The cable-terminal assembly is now ready to be swaged. Support cable from back of swage to help eliminate the shank from bending from the curve in hanging cable
The operating lever of the Type II Swaging Machine is similar to a large conventional ratchet wrench. A handle is attached to the outer end by a bolt to form a crank. To reverse the direction of the rotation of the roll dies flip the ratchet lever at the base of the handle then disengage the internal reverse latch of the machine by pulling and holding out the wire loop that extends from the right side of the machine behind and above the Feed Guide.
When swaging the larger size terminals, more leverage is needed to operate the machine, remove the crank handle and slip the handle extension (part no. 84-80) over the end of the operating lever to double its length. The motor of the power-driven machine is reversible simply by reversing the throw of the hand switch. To cause the machine to turn the roll die in the normal direction for swaging – upper roll die clockwise -flip the hand switch lever to forward position and press the foot switch; to reverse flip the hand switch lever to the reverse position and press down on the foot switch. Be careful to allow the drive motor to come to a full stop before switching directions. (The internal reverse latch is not installed in the power-driven machines.) With either machine, rotate the roll dies until their clearance arcs are opposite as shown in Figura 1. Place the assembled cable and terminal in the clearance space with the head of the terminal engaged with the terminal adapter as shown in Figure 10. Press the cable into the spring clip on the right hand end of the feed guide. Inch the roll die around until they are just touching, but not squeezing the terminal shank. Move the Feed Guide to the right until the roll dies are contacting at the proper location on the terminal shank to be swaged. As noted above in preparing the cable and terminal, if you are about to swage a number of identical cable-terminal assemblies, set the adjustable stop of the Feed Guide Assembly, as discussed in Feed Guide Assembly, so that you can repeatedly move the Feed Guide to this position relative to the dies.

Rotate the roll dies until they have passed over the terminal shank. When the first pass has been completed, a longitudinal fin or “flash” on two diametrically opposite sides of the terminal will be noticeable on the swaged portion of the shank. To eliminate the longitudinal fin, rotate the terminal 90 degrees from the first swaging position and pass it through the rolls as outlined in preceding instructions. After the second pass the terminal shank will appear smooth and round .

Finished sleeve should look like this. Be sure sleeves have been compressed the proper number of times
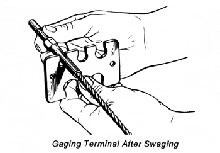
Measure the diameter of the terminal shank with the gauge. The shank should now slide through the slot from one end of the swaged portion of the other except for the slight flash which will be left after the second pass. The diameter over flash should not exceed the shank diameter after swaging by more than 0.010 inch. The gauge is made to pass a terminal which has been reduced to the proper diameter as specified in applicable MS drawings except over flash. If the terminal has not been sufficiently reduced, an additional pass may be necessary to reduce it to the required diameter. Rotate the terminal 45 degrees for the 3rd pass to make the terminal more uniform.
Over-swaging will only cause work hardening, or may lead to embrittlement which may induce terminal cracking. For this reason, we advise that you never use more than four passes. If four passes are required on any job, and after the fourth pass the diameter on the sleeve has not been reduced to the proper size, survey the equipment and recheck instructions in order to determine what is causing the problem.